Ink
Ink


 Machines


 Studio supplies


 Power & batteries


 Aftercare


 Apprentice


 Piercing & jewellery


 PMU supplies


 New arrivals
 Sale
Sale
 Gift vouchers
 Shop all

Glitter tattoos are a fun, temporary way to express yourself with dazzling designs that shimmer and shine. Perfect for parties, festivals, or just adding a little sparkle to your everyday look, these tattoos are easy to apply at home with the right materials and a bit of creativity. Follow this step-by-step guide to create your DIY glitter tattoos.
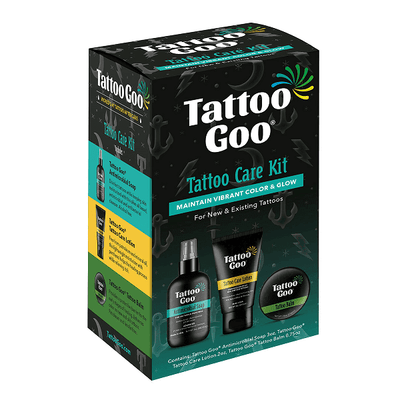
For those who also enjoy more permanent expressions of art on their skin, taking care of your tattoos is crucial for maintaining their vibrancy and health. That's where the Tattoo Goo Tattoo Care Kit (3 in 1) comes into play. This kit includes Tattoo Goo Lotion, Tattoo Goo Soap, and Tattoo Goo Balm (21g), providing comprehensive care for your new and existing tattoos. Keep your tattoos, whether glitter or ink, in top condition with the right products.
What are glitter tattoos?
Glitter tattoos are temporary body art that consists of designs created with a special body adhesive and sparkling glitter. These tattoos are a popular choice for adding a touch of glamour and fun to one's appearance, even for boys or girls, without the permanence of traditional ink tattoos.
Moreover, glitter tattoos are waterproof, can last several days, and are easily removed with oil-based products. They've become a favourite at parties and festivals, and they are among those looking to temporarily embellish their skin with eye-catching art.

Materials needed for glitter tattoo kit
- Clear Contact Paper: A tacky paper used for lining shelves or drawers, available at drugstores or home improvement stores.
- Scissors: To cut the contact paper and create your stencil.
- Thin Marker: For drawing your design on the contact paper.
- X-Acto Knife: To precisely cut out your design from the contact paper.
- Rubbing Alcohol and Cotton Pads: To clean and prepare the skin area where you will apply the tattoo.
- Clear Lash Glue: Acts as the adhesive to which the glitter will stick. It should be skin-safe and transparent when dry.
- Cotton Swabs: For cleaning up any excess glitter or adhesive around your tattoo.
- Fine Craft or Cosmetics-Grade Glitter: Use fine glitter for smooth application. Use cosmetics-grade glitter for anything near the face.
- Hair Spray or Makeup Finishing Spray: To set the tattoo and help it last longer.
Step 1: Prepare your skin
Before you start, ensure that the area of skin where you'll be applying the glitter tattoo is clean and dry. Wash the area with soap and water, and pat it dry with a towel. Avoid using lotions or oils, as they prevent the adhesive from sticking properly to your skin.
Step 2: Choose and apply the stencil
Select a stencil design that you like. Once you've picked a stencil, carefully peel off the backing and apply it firmly to your skin. Make sure there are no bubbles or wrinkles and that the stencil is securely attached to the area.
Step 3: Apply the adhesive
After the stencil is in place, apply a thin layer of skin-safe adhesive over the design area inside the stencil. Be sure to cover every part of the design, but avoid over-applying, as it can cause the glitter to clump. Wait for the adhesive to become clear or tacky before applying the glitter.
Step 4: Apply the glitter
Once the adhesive is tacky, use a small brush or fingertip to pick up a small amount of glitter and gently press it onto the adhesive. Cover all areas of the adhesive with glitter, and don't be afraid to mix colours for a unique effect. Tap off any excess glitter carefully.
Step 5: Remove the stencil and clean up
Carefully peel off the stencil from your skin, starting from one corner and pulling slowly to avoid smudging the design. If there's any loose glitter around the tattoo, gently brush it away with a clean brush. The tattoo can last several days with proper care, avoiding rubbing or scrubbing the area.
Tips for longevity and removal
- Oil-based removal: Apply coconut oil or olive oil to the tattoo and gently rub. The oil helps break down the adhesive so you can wipe away the glitter more easily.
- Alcohol-based removal: Rubbing alcohol or sanitiser can break down the adhesive. Apply it to the tattoo and gently rub with a cotton pad, but note that alcohol can dry the skin.
- Tape method: Use a piece of tape to lift stubborn glitter particles off after using oil or alcohol.
- Warm soap and water: A warm shower with gentle soap can help loosen the adhesive and glitter. Gently scrub with a washcloth, but avoid harsh scrubbing.
- Skin-safe glue remover: Products made for removing body glue are great if you apply glitter tattoos frequently.
How to customise your DIY glitter tattoo
- Choose unique stencils: Pick or create stencils that match your style or event.
- Mix glitter colours: Combine different colours of glitter for a gradient or custom effect.
- Layer glitter: Use multiple stencils or colours for a multi-dimensional look.
- Add gems or stones: While the glue is tacky, place rhinestones or gems for extra sparkle.
- Use multiple stencils: Combine designs for a larger or themed piece.
- Incorporate glitter shapes: Add glitter in star or heart shapes for variety.
- Highlight with body paint: Outline or accent with body paint for detail.
- Themed designs: Match your tattoo to events—pumpkins for Halloween, hearts for Valentine’s Day.
- Personalise with initials or symbols: Add zodiac signs, initials, or meaningful icons.
- Experiment with placement: Try the collarbone, wrists, or ankles for visual balance.
Safety precautions
- Always use cosmetic-grade glitter and body adhesive designed for skin.
- Do a patch test 24 hours before to check for irritation or allergies.
- Avoid applying near the eyes, mouth, or broken skin.
- Ensure skin is clean and dry before applying.
- Be cautious with children—test products and supervise application.
- Check product expiry dates to avoid irritation.
- If you feel any discomfort or irritation, remove the tattoo immediately.

Final thoughts
DIY glitter tattoos offer a unique way to express your style with a sparkle that's hard to miss. Whether you're going for a special occasion or just want to add a little fun to your day, following these steps will help you achieve beautiful, shimmering temporary tattoos from the comfort of your home.
Remember, the key to a great glitter tattoo is patience and creativity. Enjoy the process and wear your designs proudly.
Shop product